Let's be honest here, folks—there's nothing quite like diving into a world of sweet indulgence, and chocolate covered rice krispie treats on a stick are about to become your new obsession. Imagine this: gooey marshmallows, crispy rice cereal, and rich chocolate all wrapped up in one portable, bite-sized treat. It's like a carnival ride for your taste buds, and trust me, you're gonna want to jump on board. Whether you're hosting a party, looking for a fun weekend activity, or just craving something sweet, these delightful snacks are here to satisfy every craving.
Now, let's get real for a second. Chocolate covered rice krispie treats on a stick aren't just a dessert—they're a lifestyle. They're the perfect blend of nostalgia and creativity, taking the classic rice krispie treat to new heights. Plus, they're super easy to make, which means even the most amateur bakers can pull off this masterpiece. So grab your apron, turn up the music, and let's dive into the sweet science behind these irresistible treats.
And before you ask, yes—these treats are worth every calorie. They're more than just a snack; they're a conversation starter, a party centerpiece, and a guaranteed crowd-pleaser. Whether you're serving them at a birthday bash or surprising your friends with a homemade gift, chocolate covered rice krispie treats on a stick are bound to leave a lasting impression. So, without further ado, let's break it down and explore everything you need to know about this sugary sensation.
Table of Contents
- The Sweet History Behind Chocolate Covered Rice Krispie Treats
- Key Ingredients for Making the Perfect Treats
- Step-by-Step Guide to Making Chocolate Covered Rice Krispie Treats
- Customization Options to Suit Your Taste
- Nutritional Insights and Health Considerations
- Pro Tips for Achieving Picture-Perfect Results
- How to Store Your Chocolate Covered Rice Krispie Treats
- Presentation Ideas to Impress Your Guests
- Cost Breakdown and Budget-Friendly Alternatives
- Frequently Asked Questions About Chocolate Covered Rice Krispie Treats
The Sweet History Behind Chocolate Covered Rice Krispie Treats
Alright, let's take a trip down memory lane. The original rice krispie treat dates back to the 1930s when Kellogg's introduced this gooey, marshmallowy masterpiece to the world. Fast forward a few decades, and someone—probably a genius with a sweet tooth—decided to take things up a notch by dipping these treats in chocolate and mounting them on sticks. Voila! A dessert revolution was born.
These treats have since become a staple at fairs, parties, and family gatherings. Their popularity lies in their versatility and ease of preparation. Plus, who can resist the allure of chocolate and marshmallow combined? It's like a match made in dessert heaven.
And let's not forget the cultural impact. From Pinterest boards to Instagram feeds, chocolate covered rice krispie treats on a stick have taken the internet by storm. They're not just food—they're a trendsetter, and you better believe people are loving every second of it.
Why They're Here to Stay
Here's the deal: these treats are here to stay, and here's why:
- They're easy to make, even for beginners.
- They're customizable to fit any theme or occasion.
- They bring people together, whether at parties or potlucks.
Key Ingredients for Making the Perfect Treats
Now, let's talk ingredients. The beauty of chocolate covered rice krispie treats on a stick is that you probably already have most of what you need in your pantry. Here's a quick rundown of the essentials:
- Rice Krispies cereal: The foundation of the entire treat.
- Marshmallows: The gooey goodness that holds everything together.
- Butter: Adds richness and flavor.
- Chocolate: Choose your favorite kind—milk, dark, or white.
- Sticks or lollipop holders: For that portable convenience.
- Optional toppings: Think sprinkles, nuts, or candy pieces.
Pro tip: Don't skimp on the quality of your ingredients. Good butter and premium chocolate can elevate your treats to gourmet status, no matter how simple the recipe is.
Step-by-Step Guide to Making Chocolate Covered Rice Krispie Treats
Ready to roll up your sleeves and get to work? Here's a step-by-step guide to making chocolate covered rice krispie treats on a stick:
Step 1: Prepare the Rice Krispie Base
Melt your butter in a large pot over low heat. Once it's melted, add the marshmallows and stir until they're completely melted and gooey. Remove from heat and gradually mix in the Rice Krispies cereal until everything is coated evenly.
Step 2: Shape the Treats
Using a spoon or your hands (if you're brave enough), form the mixture into small balls or rectangles. Insert a stick or lollipop holder into each treat to create the "on a stick" effect.
Step 3: Dip in Chocolate
Melt your chocolate according to the package instructions. Once melted, dip each treat into the chocolate, ensuring it's fully coated. You can use a fork or skewer to help with the dipping process.
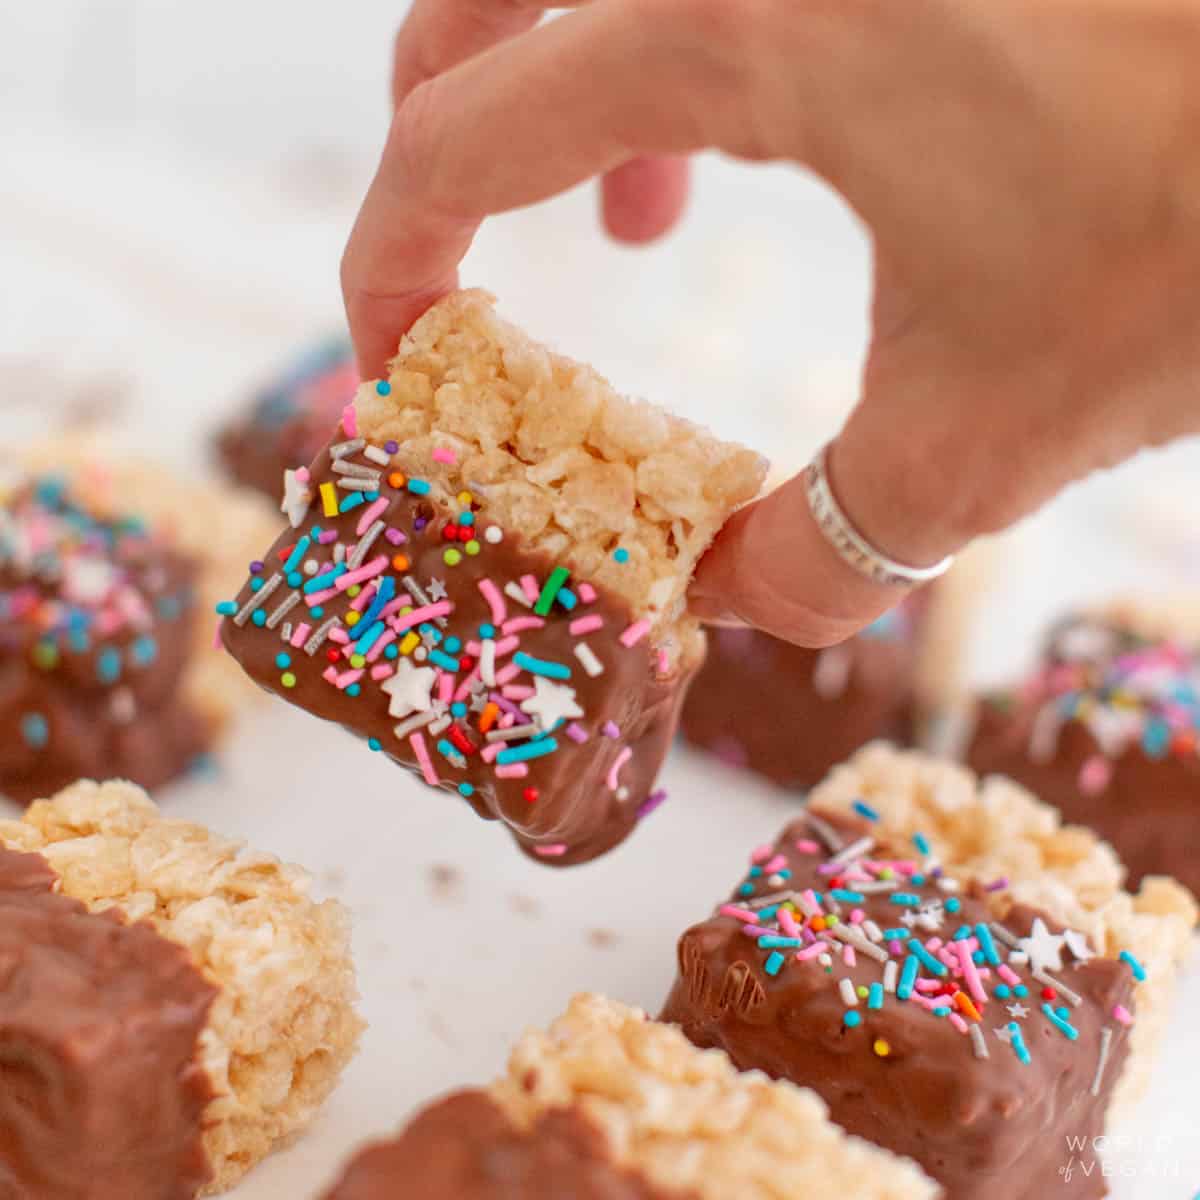
Step 4: Add Toppings
While the chocolate is still wet, sprinkle on your favorite toppings. This is where you can get creative—sprinkles, nuts, or even crushed cookies are all fair game.
Step 5: Let Them Set
Place the treats on a baking sheet lined with parchment paper and let them set in the fridge for at least 30 minutes. Once the chocolate has hardened, they're ready to serve!
Customization Options to Suit Your Taste
One of the best things about chocolate covered rice krispie treats on a stick is their endless customization potential. Here are a few ideas to get you started:
- Use different types of chocolate, like white chocolate or dark chocolate with a hint of sea salt.
- Add flavor extracts to the rice krispie base, such as vanilla, almond, or coconut.
- Experiment with unique toppings, like crushed pretzels, mini M&Ms, or crushed candy canes.
- Create themed treats for holidays or special occasions. Think heart-shaped treats for Valentine's Day or pumpkin-shaped ones for Halloween.
The possibilities are truly endless, so don't be afraid to experiment and find your perfect combination.
Nutritional Insights and Health Considerations
Let's face it—these treats aren't exactly health food, but that doesn't mean you can't enjoy them in moderation. Here's a quick breakdown of their nutritional content:
- Calories: Approximately 200-300 per treat, depending on size and toppings.
- Sugar: High, due to the marshmallows and chocolate.
- Fat: Moderate, mostly from the butter and chocolate.
For those watching their sugar intake, consider using sugar-free marshmallows or low-sugar chocolate alternatives. And remember, portion control is key—enjoying one or two treats is perfectly fine, but maybe skip the entire batch in one sitting.
Pro Tips for Achieving Picture-Perfect Results
Here are a few pro tips to help you achieve the best results:
- Use high-quality chocolate for a smoother coating.
- Chill the treats before dipping to prevent the rice krispie base from falling apart.
- Work quickly when adding toppings to ensure they stick to the wet chocolate.
- Store the treats in an airtight container to maintain freshness.
These small details can make a big difference in the final product, so don't skip them!
How to Store Your Chocolate Covered Rice Krispie Treats
Proper storage is key to keeping your treats fresh and delicious. Here's how to do it:
Place the treats in an airtight container and store them at room temperature for up to 3 days. If you want them to last longer, consider refrigerating them for up to a week. Just be sure to bring them back to room temperature before serving to avoid any unwanted texture changes.
Presentation Ideas to Impress Your Guests
Presentation is everything when it comes to dessert. Here are a few ideas to make your chocolate covered rice krispie treats on a stick stand out:
- Create a DIY dessert bar where guests can choose their own toppings.
- Arrange the treats in a decorative tray or stand for a visually appealing display.
- Package individual treats in cellophane bags with ribbon for a cute party favor.
A little effort in presentation can go a long way in making your treats unforgettable.
Cost Breakdown and Budget-Friendly Alternatives
Let's talk money. Here's a rough estimate of the cost per treat:
- Rice Krispies cereal: $2-3 per box.
- Marshmallows: $1-2 per bag.
- Butter: $1-2 per stick.
- Chocolate: $3-5 per bar.
- Sticks or lollipop holders: $5-10 for a pack of 100.
To save costs, consider using store-brand ingredients or opting for cheaper chocolate alternatives. You can also skip the fancy toppings if you're on a tight budget.
Frequently Asked Questions About Chocolate Covered Rice Krispie Treats
Here are some common questions people have about these treats:
Can I freeze them?
Absolutely! Freeze the treats in an airtight container for up to 2 months. Just be sure to thaw them at room temperature before serving.
Are they gluten-free?
Not traditionally, but you can use gluten-free rice cereal and marshmallows to make them suitable for those with dietary restrictions.
Can I use peanut butter instead of chocolate?
Definitely! Peanut butter cups or drizzled peanut butter can add a delicious twist to your treats.
And there you have it—a comprehensive guide to chocolate covered rice krispie treats on a stick. Whether you're a seasoned baker or a complete novice, these treats are sure to bring joy and sweetness to your life. So what are you waiting for? Get baking and share the love!
Kesimpulan
Chocolate covered rice krispie treats on a stick are more than just a dessert—they're a celebration of creativity, flavor, and fun. From their rich history to their endless customization potential, these treats offer something for everyone. By following the steps outlined in this guide, you can create delicious, picture-perfect treats that will impress your friends and family.
So go ahead, indulge in the sweetness, and don't forget to share your creations with the world. Whether it's through social media or in-person gatherings, these treats are bound to spread joy and happiness wherever they go. Happy baking, and remember—the sweeter the treat, the sweeter the memories!