Ever wondered how to achieve that envy-worthy eyebrow tint right at home? Well, you're in the right place, friend. In today’s beauty-driven world, having perfectly tinted brows is more than just a trend—it’s a confidence booster. Eyebrow tint at home is all about enhancing your natural beauty without breaking the bank or spending hours at a salon. So, whether you're a makeup enthusiast or just looking to elevate your everyday look, this guide is your go-to resource.
Now, let’s be real—salon treatments can get expensive, and who has the time for frequent visits, right? Plus, with everything going on in the world, staying safe and comfortable at home has become a priority. That’s where eyebrow tinting at home comes in. It’s like giving yourself a little self-care session while saving some cash. Who wouldn’t love that?
But before we dive deeper, let me tell you something—you don’t need to be a professional makeup artist to pull this off. All you need is the right tools, a bit of patience, and this guide to make sure you nail it. So, grab your favorite drink, get comfy, and let’s talk all things eyebrow tint at home!
- Bristol Motor Speedway Twitter
- Nelson Neumann Age
- Brooklyn Cyclones Twitter
- Cici Only Fans
- Leanna Lenee Age
What Exactly is Eyebrow Tinting?
First things first, let’s break down what eyebrow tinting actually means. Simply put, it’s a process where you apply a semi-permanent dye to your eyebrows to enhance their color and shape. Think of it as a magical potion that turns your dull, light brows into bold, defined ones. And the best part? It lasts for weeks, giving you that fresh-from-the-salon look every day.
Now, when we talk about doing this at home, the process remains pretty much the same, just with a DIY twist. You’ll need some basic supplies and a bit of guidance to ensure you don’t end up looking like a raccoon. Sound intimidating? Don’t worry, I’ve got your back. We’ll walk through everything step by step.
Why Should You Try Eyebrow Tint at Home?
There are tons of reasons why doing your own eyebrow tint at home is a great idea. First off, it’s super convenient. No more booking appointments weeks in advance or dealing with last-minute cancellations. Plus, it’s cost-effective. Salon treatments can add up quickly, but with a DIY kit, you can save a ton of money in the long run.
And let’s not forget the customization factor. When you do it yourself, you have full control over the shade, intensity, and application. No more worrying about a stylist not understanding your vision. It’s all about you and your brows!
Key Benefits of DIY Eyebrow Tint
- Cost-Effective: Save money by avoiding expensive salon visits.
- Convenience: Do it whenever you want, without needing an appointment.
- Customization: Choose the perfect shade and intensity for your skin tone.
- Long-Lasting Results: Enjoy tinted brows for up to 4 weeks.
Gathering Your Tools: What You’ll Need for Eyebrow Tint at Home
Before you dive into the tinting process, it’s important to gather all the necessary tools. Having everything ready beforehand will make the experience smoother and more successful. Here’s a quick list of what you’ll need:
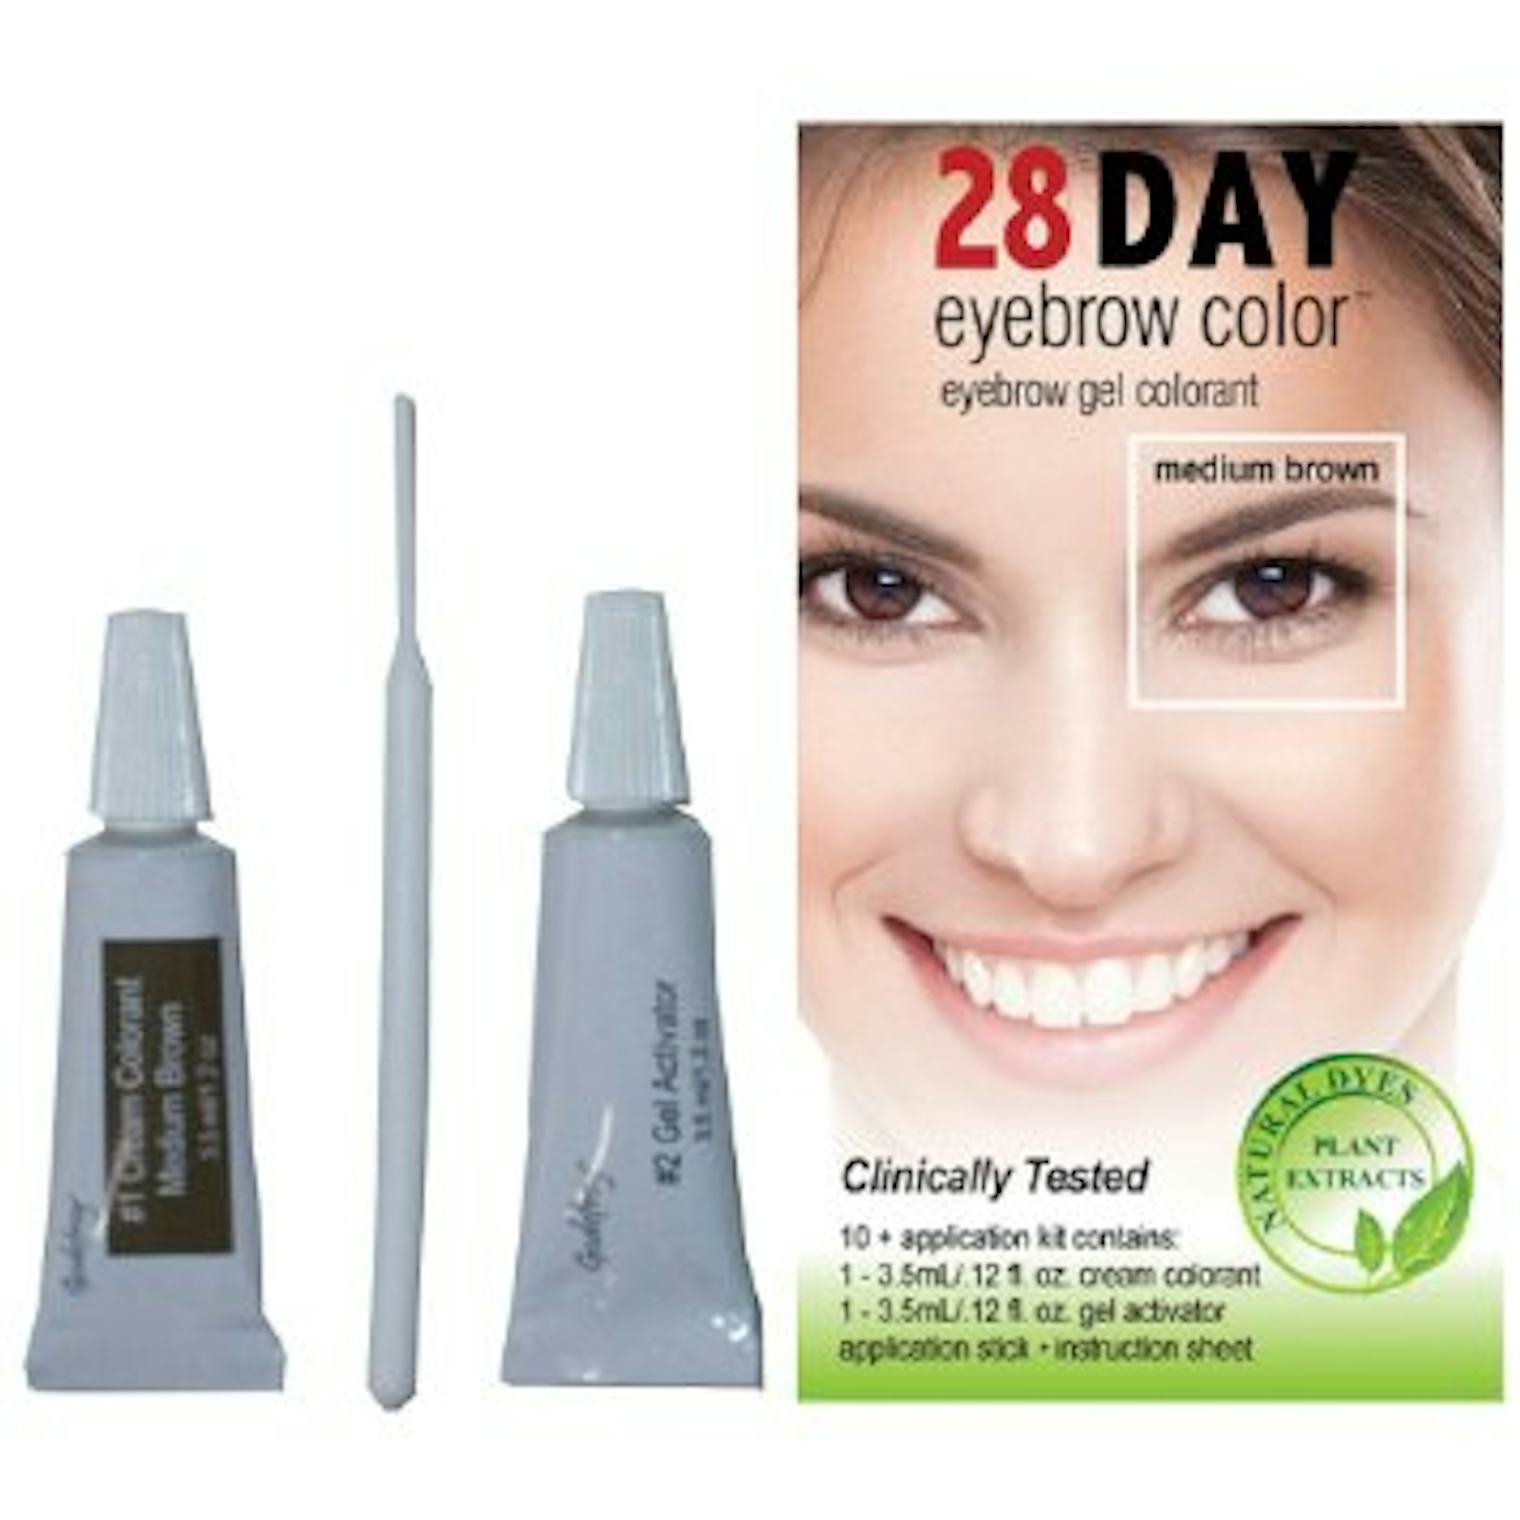
- Eyebrow Tint Kit: This usually includes the dye, developer, and applicator brush. Make sure to choose a kit that suits your hair and skin type.
- Protective Gloves: To keep your hands stain-free and avoid any mess.
- Cotton Pads: Essential for cleaning up any mistakes and removing excess dye.
- Wax Strips: These help protect the skin around your brows and prevent the dye from smudging.
- Tissue Paper: Great for blotting and cleaning up any drips or spills.
Now, let’s talk about the tint kit for a moment. Not all kits are created equal, so it’s important to choose one that matches your needs. Look for brands that offer a wide range of shades and have good customer reviews. And remember, just because it’s cheap doesn’t mean it’s the best option. Quality matters!
Tips for Choosing the Right Tint Kit
When selecting a tint kit, consider the following:
- Does it offer a variety of shades?
- Is it suitable for sensitive skin?
- Does it come with detailed instructions?
- What do other users say in their reviews?
Preparing for Your Eyebrow Tinting Session
Now that you’ve got all your tools ready, it’s time to prepare for the big event. Proper preparation is key to achieving flawless results. Start by cleaning your brows thoroughly to remove any makeup or oils that might interfere with the tint. Use a gentle cleanser and make sure your skin is dry before you begin.
Next, protect the skin around your brows by applying a thin layer of petroleum jelly or a similar product. This will act as a barrier and prevent the dye from staining your skin. And don’t forget to put on those gloves! No one wants to end up with blue fingers, trust me.
Step-by-Step Preparation Guide
- Clean your brows with a gentle cleanser.
- Apply petroleum jelly around the brow area.
- Put on protective gloves to avoid staining your hands.
- Place wax strips under your brows to protect the skin.
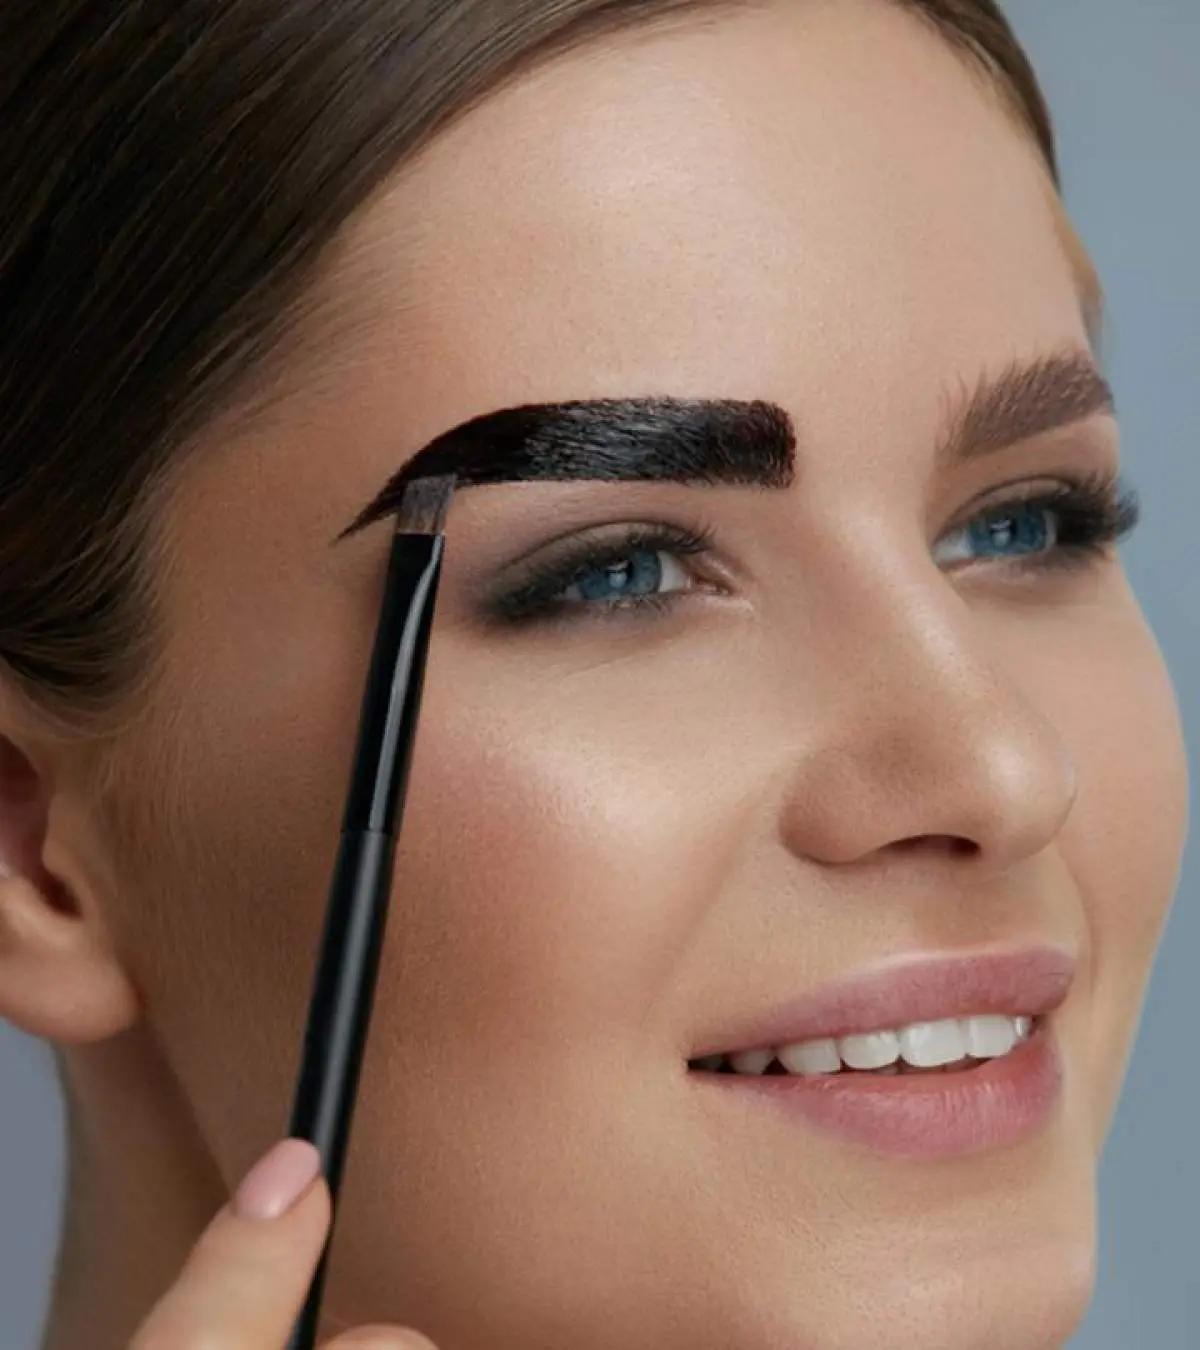
How to Apply Eyebrow Tint at Home
Alright, now comes the fun part—applying the tint! Follow these steps carefully to ensure a flawless application:
- Mix the tint and developer according to the kit’s instructions.
- Using the applicator brush, apply the tint evenly to your eyebrows, starting from the inner corner and working outward.
- Let the tint sit for the recommended time (usually around 10-15 minutes).
- Wipe off the excess dye with a damp cotton pad, being careful not to smudge.
- Finish by cleaning up any stray marks around your brows with a cotton swab.
And there you have it—perfectly tinted brows in the comfort of your own home! It’s that simple, and with a bit of practice, you’ll be a pro in no time.
Common Mistakes to Avoid
Even the best of us can make mistakes, but don’t worry—most are easily avoidable. Here are a few common errors to watch out for:
- Applying too much tint, which can lead to uneven results.
- Leaving the tint on for too long, causing it to look too dark.
- Not protecting the skin around your brows, resulting in unwanted stains.
How Long Does Eyebrow Tint Last?
One of the best things about eyebrow tinting is its longevity. On average, a tint can last anywhere from 2 to 4 weeks, depending on your skin type and hair growth. For those with oily skin, the tint might fade a bit faster, so it’s a good idea to touch it up every couple of weeks.
And here’s a pro tip: to make your tint last longer, avoid using harsh cleansers or exfoliating products around your brows. These can strip away the tint and cause it to fade prematurely.
Are There Any Risks Involved?
While eyebrow tinting is generally safe, there are a few risks to be aware of. Some people may experience allergic reactions to the dye, so it’s always a good idea to do a patch test before applying it to your brows. If you have sensitive skin, look for kits specifically designed for sensitive types.
Additionally, be cautious when choosing your shade. Going too dark can make your brows look unnatural, so it’s best to stick with a color that matches your natural hair color or is just a shade darker.
Safety Tips for Eyebrow Tinting
- Always do a patch test before applying the tint.
- Choose a shade that matches your natural hair color.
- Follow the instructions carefully to avoid over-application.
Expert Tips for Flawless Results
Want to take your eyebrow tint game to the next level? Here are a few expert tips to help you achieve perfection:
- Trim your brows before tinting to ensure an even application.
- Use a brow pencil or gel to shape your brows before applying the tint.
- Moisturize your skin regularly to prevent the tint from fading too quickly.
And remember, practice makes perfect. The more you do it, the better you’ll get. So don’t be afraid to experiment and find what works best for you.
Conclusion: Elevate Your Beauty Routine with Eyebrow Tint at Home
There you have it, folks—everything you need to know about achieving flawless eyebrow tint at home. From gathering your tools to applying the tint and maintaining your results, this guide has got you covered. Remember, it’s all about enhancing your natural beauty and having fun with it.
So, what are you waiting for? Grab your kit, put on some tunes, and get tinting! And don’t forget to share your results with us in the comments below. We’d love to hear about your experience and see those beautiful brows in action. Happy tinting!
Table of Contents
- What Exactly is Eyebrow Tinting?
- Why Should You Try Eyebrow Tint at Home?
- Gathering Your Tools: What You’ll Need for Eyebrow Tint at Home
- Preparing for Your Eyebrow Tinting Session
- How to Apply Eyebrow Tint at Home
- How Long Does Eyebrow Tint Last?
- Are There Any Risks Involved?
- Expert Tips for Flawless Results
- Conclusion
- Madden Mobile Twitter
- Amy Yazbek
- Celebrity Birthdays September 19
- Shoe Eats Turf
- Avon Football Twitter